Maintaining Your Irrigation System – A Checklist
The automated nature of modern irrigation systems is such that many people make the mistake of assuming the system they rely on works on a ‘set and forget’ basis. In this article we discuss how it's possible, even if you're not a pro, to carry out basic maintenance checks that will keep your irrigation system functioning more smoothly day to day.
No Substitute for Vigilance
While "set and forget" is probably a lot closer to the truth than it’s ever been – in terms of the degree to which a smart irrigation system can be self-regulating and can spot and flag up issues in real time – there’s still no substitute for vigilance when it comes to getting ahead - and staying ahead - of the curve.
An understanding of the possible issues that can arise across any irrigation system, coupled with the knowledge of where to look and what to do if something is wrong, can save time and money over both the short and longer term.
For anyone in charge of overseeing large-scale irrigation operations for a golf course or residential community irrigation, the importance of a functional system in good repair is hard to overstate, particularly in a part of the world like Florida. But even for smaller scale operations, regular, simple checks can keep a system functioning more efficiently and forestall expensive repair bills.
The Challenges
The fluctuations in rainfall across the seasons are dramatic here to say the least! They create a situation in which irrigation must be not only consistent, but highly focused and controlled.
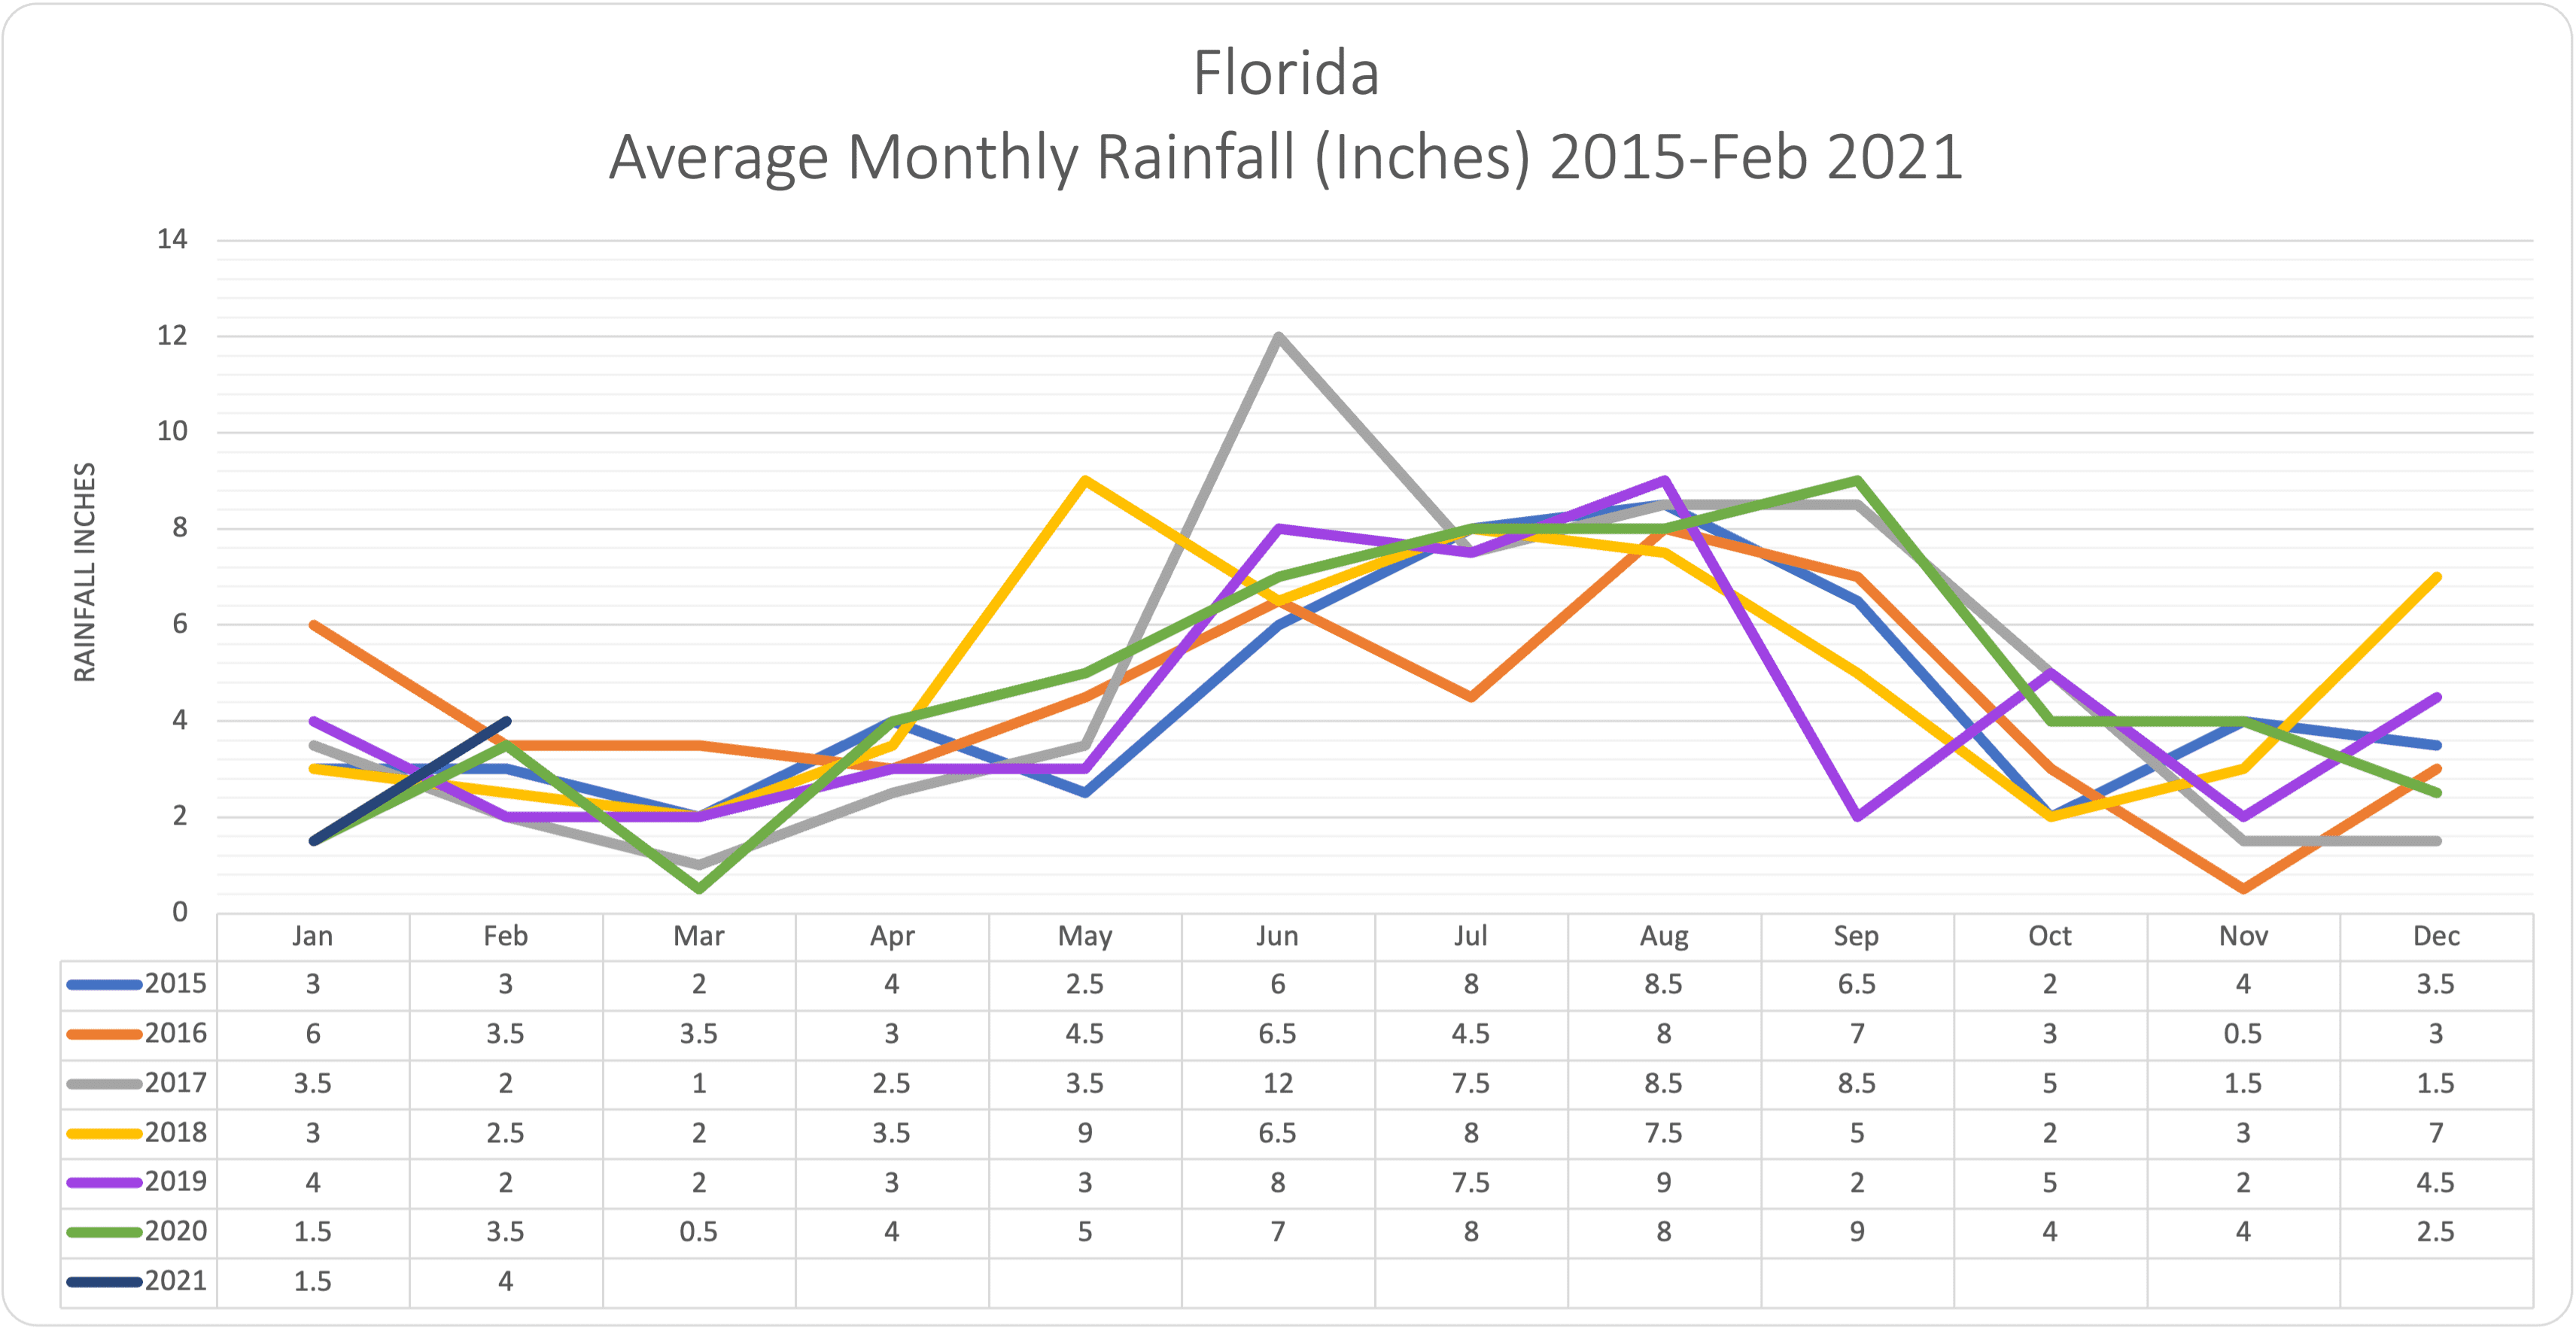
Too much water – a result which is just as likely to follow from malfunctioning irrigation equipment as too little – can be a disaster for the landscape, but the good news is that there are relatively simple measures you can take to maintain your irrigation system without having to call in the professionals too often or finding yourself having to invest in major repairs or upgrading work.
In terms of landscape management, inspection and maintenance of the irrigation system is as vital as any other form of maintenance. Many people feel reluctant to take it on themselves, however, either because they mistakenly believe, for example, that irrigation can be left to take care of itself once it's set - or they fear that spotting and dealing with any problem is something only a professional can take care of.
The key to understanding a regular in-house maintenance regime is that it involves spotting the kind of smaller scale problems that can be dealt with quickly and simply, before they have the chance to become larger problems. Even if the problems spotted are beyond the ability of a non-professional to correct, the fact that they have been highlighted at the earliest possible stage will cut the cost of any repair work needed.
The easiest way to put together and maintain a maintenance and repair checklist is to break the numerous stages involved down into individual tasks, rather than viewing the whole of the system as something to be checked and maintained in one sweep – something which the vast majority of people would find more than a little overwhelming.
Visual
The first and simplest means of checking the operation of your irrigation system is to take a good look at the landscape. Tell-tale signs that something is going wrong somewhere include pooling water, dry patches, excess run off and boggy areas.
Anything out of the ordinary is a symptom of something going wrong. It may well be as simple as the timer system needing a reset, but it could also indicate deeper problems, such as sensors in the turf not working, pumps over or under-pumping and pipes leaking underground.
Getting Physical
Although you may never personally carry out any of the following physical checks - such as flushing or cleaning sprinklers for example - it's useful to give yourself a basic understanding of some of the maintenance activities your landscape contractor or irrigation maintenance team will (or should) be carrying out on a regular basis. Being better-informed could give you useful insights into whether you're getting effective support - or whether there's a conversation to be had!
Flush the system
No matter how well designed, engineered and installed an irrigation system is, it is going to become clogged with a range of pollutants over time. The way to stop this causing damage is to flush the system on a regular basis – at the very least once a year, but the flushing may need to happen more often if the system is older or the water quality poorer.
You flush the system by opening the valves in the main line, sub-lines or laterals - while water is passing through under high pressure. The force of the water flowing through in this way should be sufficient to wash pollutants from the system.
Pipes
The easiest way to check the integrity of the pipes in your system is to shut everything down and then pressurize the network.
With no sprinklers in operation the pressure across the system should be maintained unless there is a leak. In non-pressurized systems the sign of a leak or fracture is the sight of sprinklers not performing to full effect even when the pumps are operating properly.
Controllers
One simple way to check any wall mounted controllers that are part of your system is to take a look at the displays. If they are showing information which you know to be incorrect then this could be a sign of a recent power outage or surge, while blank displays may signal faulty wiring or a blown fuse.
Timers
If your timers are malfunctioning it could manifest itself in the irrigation cycle repeating more often than it should, or whole zones not being watered when they should. If the fuses blow regularly, for example, it could point to a faulty valve solenoid, damaged or shortened wiring or a timer which needs to be replaced entirely.
Similarly, one zone not functioning correctly could point to damaged wiring at the timer or at one manifold.
Sprinklers
Ideally you should clean the sprinklers in your system prior to running any other checks, as debris trapped in the system or sprinkler heads which are clogged with dirt could provide a simple solution to any issues which you’ve spotted.
Cleaning the sprinkler filters
First of all you need to grab the tip of the sprinkler and pull it up, clamping a vice grip to the shaft of the sprinkler tip to stop it being pulled back down. Unscrew the top of the sprinkler and remove the filter screen – you may need to use needle nose pliers to do this.
Once it’s out, rinse the screen in water and scrub it with a toothbrush to remove any debris such as sand. Once it’s been cleaned, the filter can be reinstalled.
Cleaning the sprinkler heads
Take the sprinkler heads off the sprinkler body by turning them counter-clockwise, and then lifting them off and placing them in a bucket of water. Pour rust remover over the sprinkler head to remove calcium and other minerals, and leave it to soak for 30 minutes.
After 30 minutes, scrub the sprinkler head to remove any build-up which might still be present and rinse in clean water. Before replacing the sprinkler head, coat the moving parts with a lubricant such as WD-40, which will help to prevent further build-up of minerals.
Clearing the valves
Detach the sprinkler head by turning it counter-clockwise and then turn the valve on for a period of approximately 5 minutes. This will clear the valve of debris and flush the system. Replace the sprinkler head after flushing in this manner.
In some cases the problems might be caused by something as simple as the direction the sprinkler heads are pointed in. The method used to adjust a sprinkler head will vary depending upon whether it is a stationary, pop-up, rotor or pulsating head:
- Stationary – a spray radius adjustment screw will usually be located at the top of the nozzle. This can be moved to point in the desired direction and turning the screw clockwise will lower the water pressure.
- Pop-up – this head will need to be adjusted while the sprinkler is operating. A flat-head screwdriver can be used to adjust the screw at the top of the nozzle. Turning the screw clockwise will decrease the width of the area being sprayed, while turning it counter-clockwise will increase the width.
- Rotor – rotor sprinklers have a set screw on the nozzle which can be turned to adjust the spray direction of the amount of water. Precise instructions vary depending upon the rotor sprinkle, so the instruction manual will need to be consulted.
- Pulsating – no tools are needed to change the settings of a pulsating sprinkler head. Tabs on the head of the nozzle can he adjusted to set the speed of the water output to the desired rate.
Many of the issues you might uncover with these simple maintenance checks are lead indicators - telling you something about an existing, more serious problem - or forewarning of an issue that could develop if the problem isn't nipped in the bud. In both cases, your vigilance is potentially saving you money.
Final Word
While visual checks and a dedication to keeping a watchful eye on your irrigation system are an important weapon in your armory, it's also true to say you can't dispense with the backup of professional irrigation system expertise. If you feel your irrigation system isn't fulfilling its promise, or worse, you're stuck in a costly cycle of repair and failure, we can help. Call us on 800 548-1548 or email us to start conversation.